Read the official Remote Desktop Manager Portable download and setup
If you don’t install the .NET 9 runtime using an MSI or EXE installer (like in my case, where I installed .NET 9 via Scoop to manage multiple versions), you may encounter an error stating that .NET 9.x was not found.

Here’s how to make Remote Desktop Manager (RDM) work with the .NET 9 runtime installed via Scoop or Other tools:
Steps:
- Create a simple PowerShell script
.ps1file. - Create a shortcut to the script.
- Use the shortcut to launch RDM.
Example Script: startup.ps1:
$env:DOTNET_ROOT = "C:\Users\siritas\scoop\apps\dotnet-sdk\9.0.303"
$env:PATH = "$env:DOTNET_ROOT;$env:PATH"
dotnet --info

# Define the path to your EXE file
$exePath = "C:\Users\siritas\apps\Devolutions.RemoteDesktopManager\RemoteDesktopManager.exe"

Start-Process -FilePath $exePath -Verb Open -WindowStyle Normal
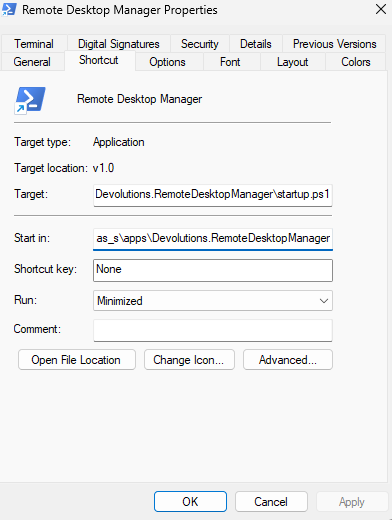
Shortcut Properties:
-
Target:
C:\Windows\System32\WindowsPowerShell\v1.0\powershell.exe -ExecutionPolicy Bypass -File C:\Users\siritas\apps\Devolutions.RemoteDesktopManager\startup.ps1 -
Start in:
C:\Users\siritas\apps\Devolutions.RemoteDesktopManager
🎉 That’s it! RDM will now launch without requiring a system-wide .NET 9 installation.